How to use MIF cloud service?
OpenNebula is simple but feature-rich, production-ready, customizable solution to manage private clouds. To login into portal please use VU MIF username and password.
- OpenNebula Sunstone portal - supports Internet Explorer (>= 9), Firefox (> 3.5) and Chrome browsers. The upload of files and images works with Firefox (>= 4) and Chrome (>= 11).
Each MIF user is provided with such IT resources:
CPU: 1.0
MEMORY: 5GB
VMS: 5 (VM quantity)
Datastores/default: SIZE=20GB, IMAGES=10
Datastores/files: SIZE=1GB, IMAGES=10
Datastores/qcow2: SIZE=20GB, IMAGES=10
Datastores/lvm: SIZE=20GB, IMAGES=10
Networks/VNET1: LEASES=2
Networks/VNET2: LEASES=5
NOTE: If you don't use your VM please delete it.
User Configuration
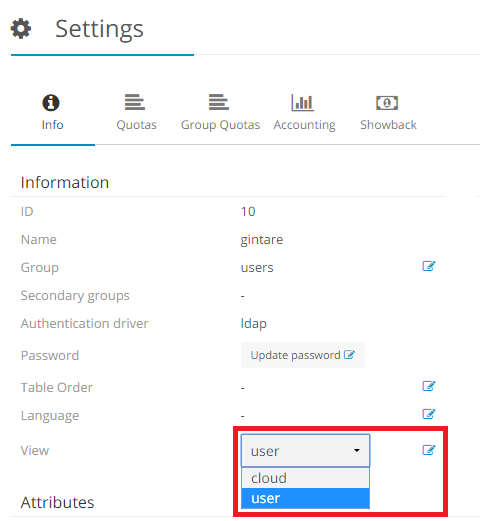
There are two views: cloud and user:
- cloud – for simplified use when new VMs are created from existing templates.
- user – all features are available to the user, but may require some training (default).
You can change user view by going to username → Settings → Info → View:

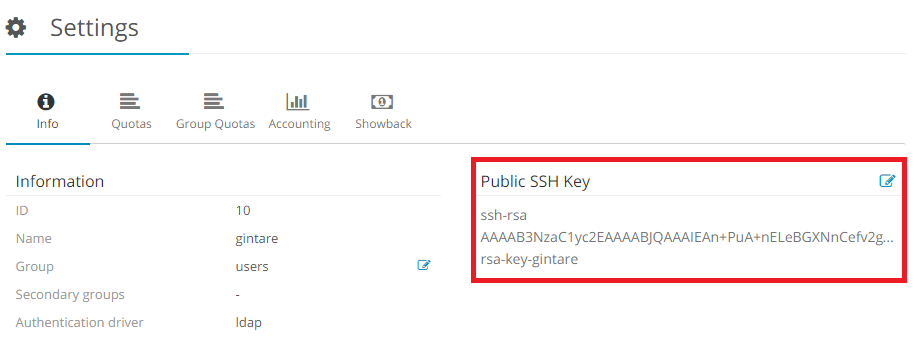
Before creating virtual machines it is recommended to upload the public part of your SSH key. If you are using cloud view, you can do this in User Name → Settings → Config → Add SSH Key. If you are using user view, load the SSH public part into the Public SSH Key field:
Creating a virtual machine
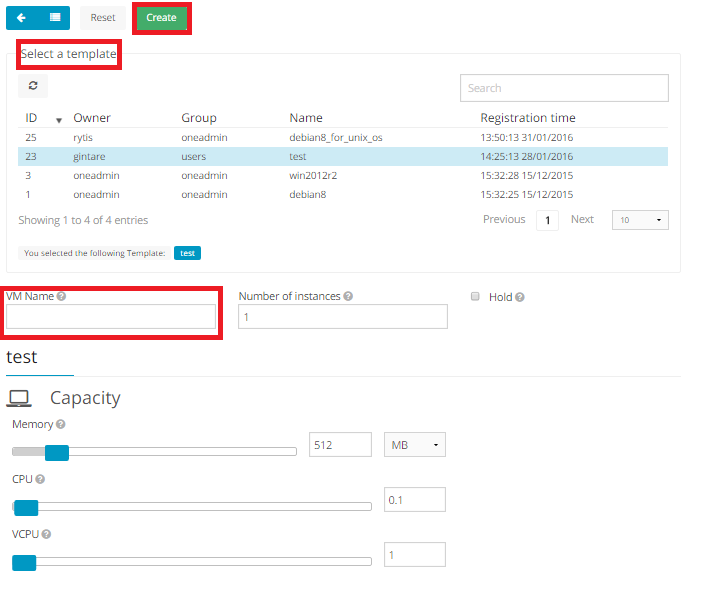
To create a new VM you have to go to Virtual Resources → Virtual Machines → click green plus button. Then choose a template, fill in your VM name, change capacity (if needed) and click “Create” button.
Go to Virtual Resources → Virtual Machines to view the status of your virtual machine.
Remarks:
Windows 2012 R2 virtual disk is recommended for use with templates containing the prefix win.
| INSTANCE_TYPE | CPU | VCPU | MEMORY | DISK_SIZE | swap |
|---|---|---|---|---|---|
| micro | 0.1 | 1 | 256 | - | 512 |
| tiny, m1.tiny | 0.25 | 1 | 512 | 5G | 512 |
| small, m1.small | 0.5 | 2 | 1024 | 10G | 1024 |
| medium | 1 | 4 | 2048 | 20G | 1024 |
| large | 6 | 6 | 10G | 50G | 5G |
| xlarge | 12 | 12 | 20G | 100G | 10G |
States of VM
| Short state | State | Meaning |
|---|---|---|
| pend | Pending | By default a VM starts in the pending state, waiting for a resource to run on. It will stay in this state until the scheduler decides to deploy it, or the user deploys it using the onevm deploy command. |
| hold | Hold | The owner has held the VM and it will not be scheduled until it is released. It can be, however, deployed manually. |
| prol | Prolog | The system is transferring the VM files (disk images and the recovery file) to the host in which the virtual machine will be running. |
| boot | Boot | OpenNebula is waiting for the hypervisor to create the VM. |
| runn | Running | The VM is running (note that this stage includes the internal virtualized machine booting and shutting down phases). In this state, the virtualization driver will periodically monitor it. |
| migr | Migrate | The VM is migrating from one resource to another. This can be a life migration or cold migration (the VM is saved and VM files are transferred to the new resource). |
| hotp | Hotplug | A disk attach/detach, nic attach/detach operation is in process. |
| snap | Snapshot | A system snapshot is being taken. |
| save | Save | The system is saving the VM files after a migration, stop or suspend operation. |
| epil | Epilog | In this phase the system cleans up the Host used to virtualize the VM, and additionally disk images to be saved are copied back to the system datastore. |
| shut | Shutdown | OpenNebula has sent the VM the shutdown ACPI signal, and is waiting for it to complete the shutdown process. If after a timeout period the VM does not disappear, OpenNebula will assume that the guest OS ignored the ACPI signal and the VM state will be changed to running, instead of done. |
| stop | Stopped | The VM is stopped. VM state has been saved and it has been transferred back along with the disk images to the system datastore. |
| susp | Suspended | Same as stopped, but the files are left in the host to later resume the VM there (i.e. there is no need to re-schedule the VM). |
| poff | PowerOff | Same as suspended, but no checkpoint file is generated. Note that the files are left in the host to later boot the VM there. |
| unde | Undeployed | The VM is shut down. The VM disks are transfered to the system datastore. The VM can be resumed later. |
| fail | Failed | The VM failed. |
| unkn | Unknown | The VM couldn’t be reached, it is in an unknown state. |
| done | Done | The VM is done. VMs in this state won’t be shown with onevm list but are kept in the database for accounting purposes. You can still get their information with the onevm show command. |
VM states scheme is here.
| Command | Explanation |
|---|---|
| Delete | The VM is immediately destroyed no matter its state. Hosts are cleaned as needed but no images are moved to the repository, leaving then in error. Think of delete as kill -9 for a process, an so it should be only used when the VM is not responding to other actions.. |
| Shutdown | Gracefully shuts down a running VM, sending the ACPI signal. Once the VM is shutdown the host is cleaned, and persistent and deferred-snapshot disk will be moved to the associated datastore. If after a given time the VM is still running (e.g. guest ignoring ACPI signals), OpenNebula will returned the VM to the RUNNING state. |
| Suspend | The VM state is saved in the running Host. When a suspended VM is resumed, it is immediately deployed in the same Host by restoring its saved state. |
| PowerOff | Gracefully powers off a running VM by sending the ACPI signal. It is similar to suspend but without saving the VM state. When the VM is resumed it will boot immediately in the same Host. |
| Undeploy | Gracefully shuts down a running VM, sending the ACPI signal. The Virtual Machine disks are transferred back to the system datastore. When an undeployed VM is resumed, it is be moved to the pending state, and the scheduler will choose where to re-deploy it. |
| Stop | Same as undeploy but also the VM state is saved to later resume it. |
| Resume | Resumes the execution of VMs in the stopped, suspended, undeployed and poweroff states. |
| Reboot | Gracefully reboots a running VM, sending the ACPI signal. |
| Hold | Sets the VM to hold state. The scheduler will not deploy VMs in the hold state. Please note that VMs can be created directly on hold, using ‘onetemplate instantiate –hold’ or ‘onevm create –hold’. |
| Release | Releases a VM from hold state, setting it to pending. |
| Deploy | Starts an existing VM in a specific Host. |
| Boot | Forces the hypervisor boot action of a VM stuck in UNKNOWN or BOOT state. |
| Recover | If the VM is stuck in any other state (or the boot operation does not work), you can recover the VM by simulating the failure or success of the missing action. |
| Snapshot | You can take a snapshot of a VM disk to preserve or backup its state at a given point of time. |
| Disk hotplug | New disks can be hot-plugged to running VMs with the onevm disk-attach and disk-detach commands. |
| NIC hotplug | You can also hotplug network interfaces to a RUNNING VM. |
| Resizing VM | If you have created a Virtual Machine and you need more resources, the following procedure is recommended: Perform any operation needed to prepare your Virtual Machine for shutting down, e.g. you may want to manually stop some services… 1. Poweroff the Virtual Machine. 2. Re-size the VM. 3. Resume the Virtual Machine using the new capacity. |
| Sheduling | Most of the onevm commands accept the ‘–schedule’ option, allowing users to delay the actions until the given date and time. |
VM Management
In order to log in and use your VM it must be in running state. Click on your VM name and go to Info tab where you will find all the information needed to log in.
Attribute CONNECT_INFO1 for Linux users. Copy attribute value to command line to log in to your VM.
Attribute CONNECT_INFO2 for Windows users who use Putty terminal emulator. Copy attribute value to command line or enter corresponding values (For example: IP/Hostname = 193.219.91.103, port=14152) into Putty to log in to your VM.
To use the redirects of TCP connections, you must add TCP_PORT_FORWARDING attribute value with the desired connections (max 4). After changing the attribute value, remember to restart your VM (PowerOff → Boot) and to check which connections were created. For example, if you want to open connection 80, type 80 and restart the VM. You will see TCP_PORT_FORWARDING value change to PORT: 80, where PORT is an external IP (PUBLIC_IP value) connection through which you can connect to the VM of your desired connection (80).
On a VNET1 network, VM can receive not only the usual internal IPv4 address but also the globally accessible IPv6 address. More about connecting to IPv6.
Virtual machine network settings
From September 1, 2022, by default, the virtual machine can only be accessed from the MIF network and via VU VPN. To make your virtual machine accessible from external networks, you would need to change the firewall in the network settings in the template you will use to create the virtual machine.
1. If you are building a machine using templates. Choose the template you want, open it and make a copy by pressing the Clone button.
2. Open the copy of your template and press Update → Network → Advanced Options.
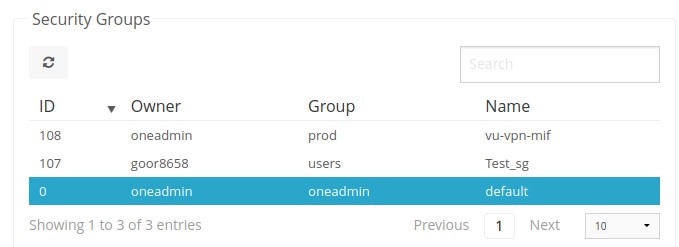
3. Below you will find Security Groups, by default vu-vpn-mif will be selected, you need to select default and save the template.

Increasing Resources of VM
To increase your VM resources, please write a request by email itapc@mif.vu.lt.


